How to Cut Fabric Using Paper Templates
One of the key steps in making your “Hey, Scout” quilt top is accurately cutting your fabric pieces using paper templates. In this blog post, I’ll walk you through the step-by-step process of using paper templates to cut your fabric pieces, along with some handy tips and tricks to ensure your quilt turns out beautifully.
Step 1: Preparing Your Paper Templates
Before you start cutting your fabric, you need to prepare your paper templates. Here’s how:
Print the Templates
Print out the paper templates provided with your quilt pattern. Ensure that your printer settings are set to “actual size” or “100% scale” so that your templates are the correct size.

Check the Scale
After printing, measure the template to make sure it matches the dimensions specified in the pattern. A slight variation can throw off your entire quilt.

Cut Out the Templates
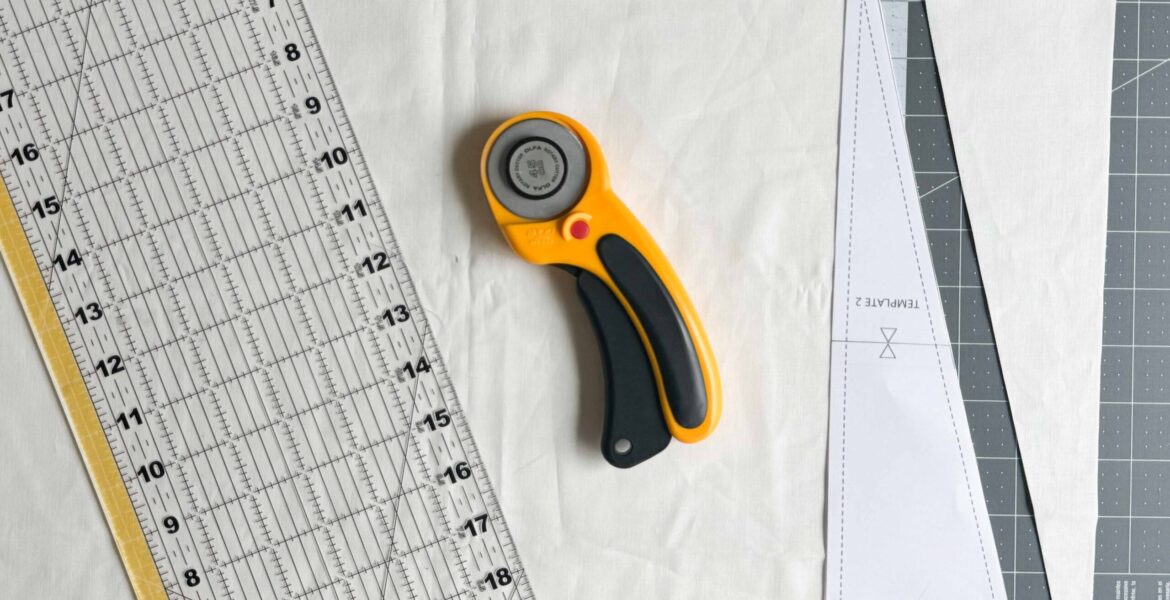
Carefully cut out the paper templates along the lines using scissors or a rotary cutter. For accuracy, use a rotary cutter with a small blade, as it allows for more precise cuts. The pennant flag templates for this quilt require additional assembly. Line up the triangles for each corresponding piece and overlap the paper where indicated. You can secure it with scotch tape or a glue stick.


Step 2: Preparing Your Fabric
Now that your templates are ready, it’s time to prepare your fabric for cutting.
Press Your Fabric
Press your fabric to remove any wrinkles. This ensures that your cuts are accurate and that the fabric lies flat when you place the templates on it.
Starch the Fabric
Lightly starch your fabric if it’s particularly slippery or prone to shifting. Starching helps keep the fabric stable, making it easier to cut accurately.
Place Your Fabric on a Cutting Mat
Lay your fabric on a cutting mat, making sure the fabric is smooth and flat without any bumps or folds. When using a patterned fabric, make sure the correct side is up before positioning the template. Depending on the template’s shape, it’s possible to cut pieces backward, which can result in wasted fabric.
Step 3: Positioning and Cutting the Fabric
With your templates and fabric prepared, you’re ready to start cutting!
Position the Template
Place the paper template on the fabric, making sure it’s aligned with the grainline if specified. The grainline usually runs parallel to the selvage edge of the fabric. For the most efficient use of fabric, you can alternate the direction of each piece by 180 degrees.

Secure the Template
I typically use an acrylic ruler and rotary to cut my template pieces. I have found the weight of the ruler keeps the template and fabric in place while cutting. However, you can pin the paper template to the fabric or use a small amount of fabric-safe adhesive spray. Alternatively, you can use pattern weights to hold the template in place if you prefer not to use pins.

Cutting the Fabric
Using Scissors: If you’re using scissors, carefully cut around the template, keeping your cuts smooth and accurate.
Using a Rotary Cutter: For straight lines or larger pieces, a rotary cutter can be more efficient. Line up the 1/4″ mark on the ruler with the dashed 1/4″ seam allowance line on the paper template.

Cutting Multiple Layers
If your pattern requires multiple pieces of the same shape, you can cut several layers of fabric at once. Stack the fabric layers neatly, place the template on top, and cut through all the layers simultaneously. This is especially useful for shapes that are repeated throughout the quilt.


Tips and Tricks for Success
- Sharp Tools: Always use sharp scissors or a fresh rotary blade to cut fabric. Dull tools can lead to inaccurate cuts and frayed edges.
- Test Cutting: If you’re unsure about a particular cut, do a test run on scrap fabric first. This will help you feel more confident when cutting your actual quilt pieces.
- Marking Seam Allowances: If your pattern requires precise seam allowances, consider marking them on the fabric pieces before you start sewing. This is especially helpful for tricky angles or curves.
- Stay Organized: Keep your cut fabric pieces organized with labels or pins. This will make the piecing process smoother.
- Patience is Key: Take your time, especially with intricate shapes. Precision in cutting leads to better results in your finished quilt.
Pin It For Later


More Quilt Scout Content
Featured Posts

Quilt Camp 2024: The Virtual Quilting Retreat for Quilt Scouts


How to Construct a Pennant Flag Quilt Block

How to Cut Fabric Using Paper Templates

Related Posts

Quilt Camp 2024: The Virtual Quilting Retreat for Quilt Scouts
As the weather cools and quilters everywhere hunker down with cozy projects, Quilt Scouts are preparing …

How to Construct a Pennant Flag Quilt Block
The Hey, Scout quilt is the free pattern designed exclusively for Quilt Scout members. As part …

How to Cut Width of Fabric Strips
When it comes to cutting fabric for traditionally pieced quilts, width of fabric cuts are the …