How to Construct a Pennant Flag Quilt Block
The Hey, Scout quilt is the free pattern designed exclusively for Quilt Scout members. As part of the Hey, Scout quilt along, I’m going to show you exactly how to construct the pennant flag blocks. In this guide, I’ll take you through each step to ensure your pennant flag quilt block is both precise and beautiful.
Step 1: Make the Pennant Header Subblock
Create a Strip Set
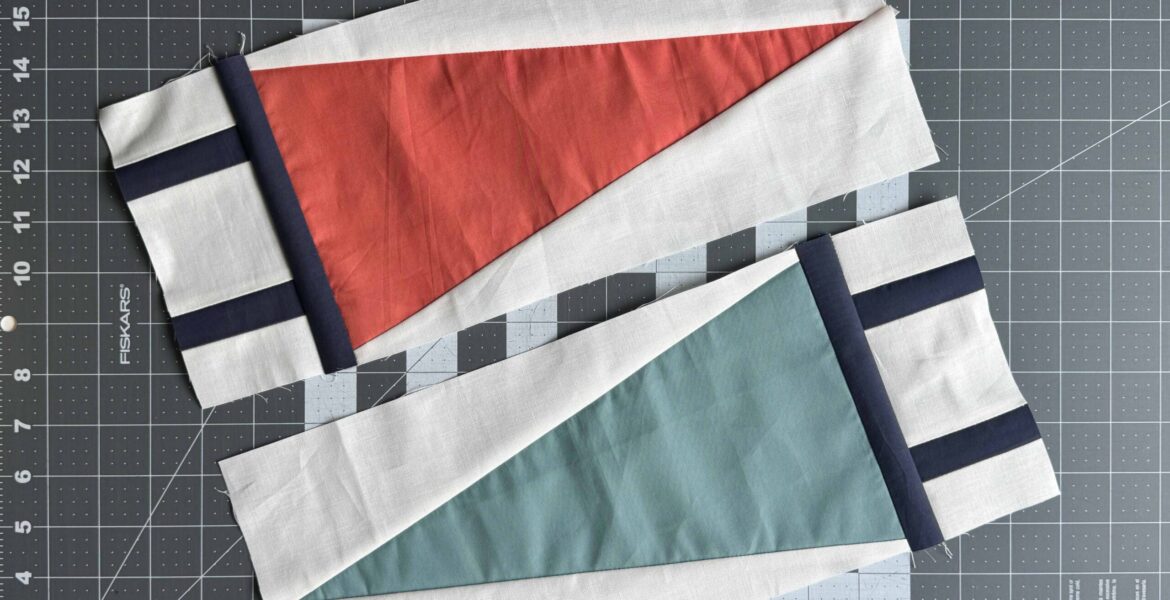
Start by sewing together 2 C1 strips, 2 B1 strips, and 1 C2 strip to create a strip set. It’s crucial to use a scant ¼” seam when working with strip sets. To ensure accuracy, I recommend testing your seam allowance before piecing the strips. For a detailed guide on this, check out our blog post on How to Test for an Accurate ¼” Seam Allowance.
Also, consider reducing your stitch length to 1.5 to 2.0 mm. This helps prevent the seams from separating after you subcut the strip set. When it comes to pressing, I prefer to press the seams open, which helps maintain the subblock’s width. However, feel free to press the seams in whichever direction works best for you.

Subcut the Strip Set
Once your strip set is ready, subcut it into 2¾” wide subblocks. As you cut, be sure to square up your cuts, ensuring they are perpendicular to the strip. It’s common for cuts to become slightly askew as you progress down the strip, so take your time and adjust as necessary.

Step 2: Piece Together T1 and T2
Line Up T1 and T2 Pieces
Aligning Template 1 (T1) and Template 2 (T2) pieces can be a bit tricky because they are triangular and tend to stretch. To avoid stretching, consider starching these pieces and using pins to keep them in place.

When lining up the narrow end of T1 (the point of the pennant), T2 (your background fabric) should completely cover Fabric A. While at the wide end of T1, ensure that the cut edges of the templates “criss-cross” at the ¼” seam.


Step 3: Piece Together T1 and T3
Lining Up and Sewing T1 and T3
Next, line up T1 and T3 just like you did with T1 and T2. After sewing, you should have at least ¼” of background fabric extending past the pennant’s point. If there’s less than ¼”, you risk clipping off the point during the final block assembly.


Step 4: Attach B2 and the Pennant Header
Finishing Touches
Now that the tricky part is done, attach B2 to the ends of each pennant and press your seams. Finally, attach the previously constructed header subblocks to the opposite side of the B2 piece. And there you have it—a beautifully crafted pennant flag subblock, ready to be added to your quilt top!


Hey, Scout Quilt Along
Do you need to catch up on the quilt along? Make sure to check out the blog posts How to Cut Fabric Using Paper Templates and How to Cut Width of Fabric Strips.
More Quilt Scouts Content
Featured Posts

Quilt Camp 2024: The Virtual Quilting Retreat for Quilt Scouts


How to Construct a Pennant Flag Quilt Block

How to Cut Fabric Using Paper Templates

Related Posts

Quilt Camp 2024: The Virtual Quilting Retreat for Quilt Scouts
As the weather cools and quilters everywhere hunker down with cozy projects, Quilt Scouts are preparing …
How to Cut Fabric Using Paper Templates
One of the key steps in making your “Hey, Scout” quilt top is accurately cutting your …

How to Cut Width of Fabric Strips
When it comes to cutting fabric for traditionally pieced quilts, width of fabric cuts are the …