

I’ve admired temperature quilts from afar for years — the gradients, the slow build, the way they quietly document a whole year of life in fabric.
But it took a nudge from a brand new Quilt Scout member and YouTuber, Brendan (aka Mister Quilter), for me to finally say: this is the year.
Watching Brendan start his first temperature quilt reminded me that these projects don’t need to be perfect or precious. They just need to be started. So here we are.
If you want to go deeper into the story behind this project (and hear more about how this all got started), I also recorded a podcast episode where I walk through my thought process, planning decisions, and what I’m hoping this quilt becomes over the next year. You can listen to that here
In this post, I want to walk you through how I planned my color palette, temperature key, and quilt layout, and share a free planning resource I created to make temperature quilts feel a little less intimidating and a lot more fun.
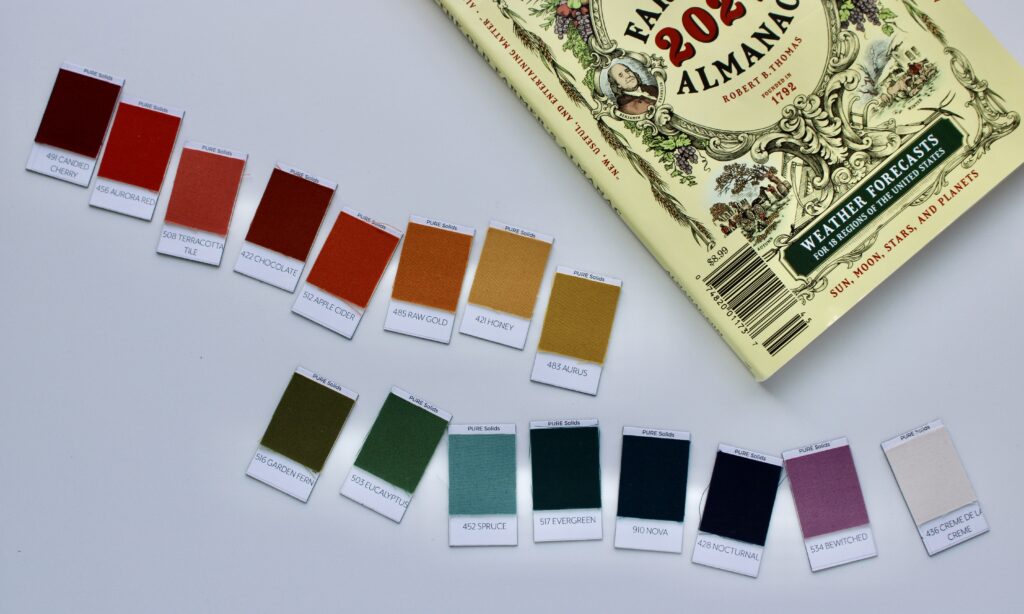
Starting With Fabric: A 16-Color Gradient
The very first thing I did was pull fabric from my stash.
I knew I wanted a clear, readable gradient, so I started arranging solids from coldest to warmest until I landed on 16 fabrics that felt balanced and expressive without being overwhelming.
All of the fabrics I’m using are pure solids from Art Gallery Fabrics, and yes — they’re all available in the Quilt Scouts shop.
Most temperature quilts use somewhere between 10–20 fabrics, depending on:
- The pattern or block style
- The overall quilt size
- How much variation you want to see
- What you already have on hand in your stash
Sixteen felt like the sweet spot for me — enough nuance to show seasonal shifts, but not so many colors that the quilt would feel chaotic.
Researching Historic Temperatures (Before Locking Anything In)
Before assigning temperature ranges, I did a little research into historic weather data for Castle Rock, Colorado.
Historically, temperatures here have ranged from:
- –27°F on the cold end
- 102°F on the warm end
That’s a huge spread, and knowing that upfront helped me avoid a very common temperature quilt problem: running out of colors when the weather does something dramatic.
Planning for extremes early meant I could build a temperature key that would actually hold up for a full year.
Creating the Temperature Key (And Why My Ranges Aren’t Even)
Once I knew my total temperature range and had my 16 fabrics laid out, I built my temperature key.
Here’s the important part:
Not all temperature ranges are the same size — and that’s intentional.
Why I Used Uneven Temperature Ranges
- Extreme cold and extreme heat don’t happen very often
- Middle-range temperatures happen constantly
- If every range were evenly spaced, most of the quilt would live in just a few middle colors
So instead:
- I used wider ranges for the extreme highs and lows
- I used narrower ranges through the middle temperatures
This creates:
- More visible color changes during the most common days
- A more dynamic, interesting quilt overall
- Clear visual markers when truly extreme weather hits
It’s a small planning decision that makes a big difference once you’re 200+ days into the year.
My Color Palette + Temperature Key
Here’s the full temperature key (in Fahrenheit) I’m using for my quilt:
Cold to Warm:
- –40 to –20: Crème de la Crème
- –19 to –5: Bewitched
- –4 to 10: Nocturnal
- 11 to 20: Nova
- 21 to 30: Evergreen
- 31 to 40: Spruce
- 41 to 45: Eucalyptus
- 46 to 49: Garden Fern
- 50 to 54: Aurus
- 55 to 60: Honey
- 61 to 68: Raw Gold
- 69 to 75: Apple Cider
- 76 to 82: Chocolate
- 83 to 88: Terracotta Tile
- 89 to 95: Aurora Red
- 96 to 105: Candied Cherry
This palette moves from cool neutrals and deep greens into warm golds, rusts, and reds — very “four seasons, Colorado edition.”
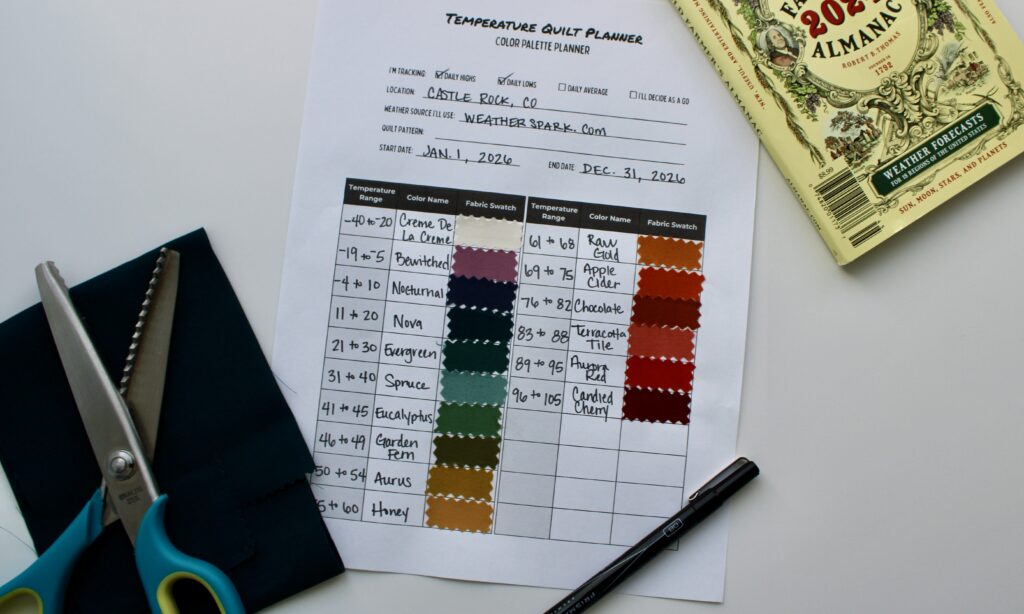
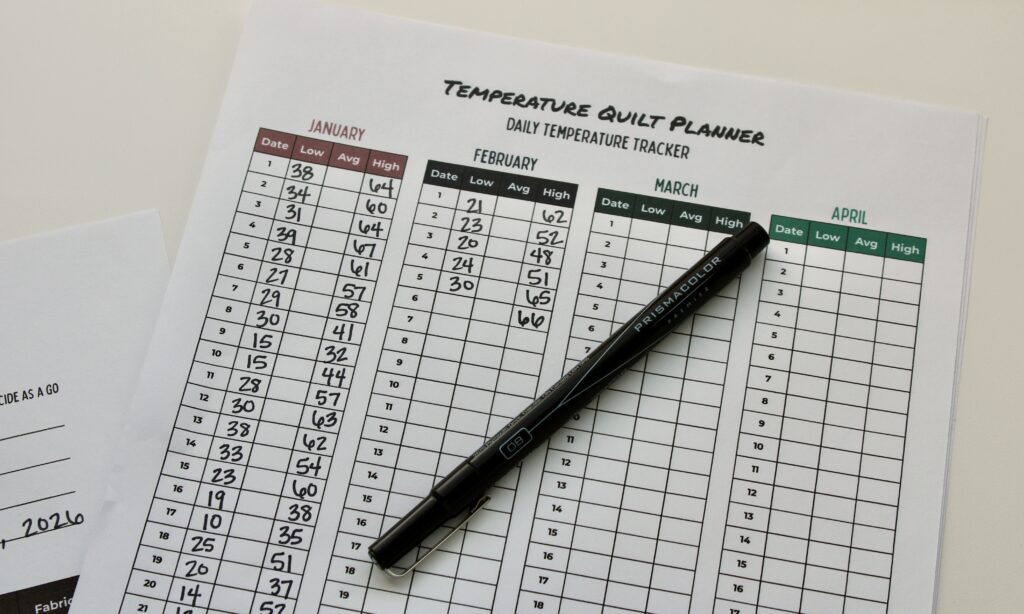
Planning It All on Paper (Because Memory Is a Lie)
Once I had my palette and temperature key, I knew I didn’t want to keep everything straight in my head for an entire year.
So I created a Temperature Quilt Planner — and then decided to make it a free download for anyone else planning a temperature quilt.
The planner includes:
- Space to plan your color palette
- A clear temperature key
- A 365-day temperature tracking chart (plus space for leap years)
- Room to track daily highs, lows, or averages
It’s designed to live next to your sewing space and turn temperature tracking into a simple daily ritual instead of a mental load.
You can download the Temperature Quilt Planner for here.
My Quilt Layout: Highs + Lows Using HSTs
For the quilt design itself, I’m using a mix of large and small half-square triangles.
Each HST represents one day:
- One half = the daily low
- One half = the daily high

I love this approach because:
- It visually captures the difference between day and night
- It adds movement and contrast without complicated piecing
- It keeps the structure simple while letting the color story shine
The layout is intentionally straightforward — this is a year-long project, and I wanted something soothing to sew and easy to return to over and over again.
Why Temperature Quilts Are Worth the Commitment
Temperature quilts aren’t really about the weather.
They’re about:
- Noticing patterns
- Marking time
- Letting a quilt quietly collect memories
This quilt will tell the story of a year in my life — the routines, the seasons, the ordinary days and the extreme ones. And I love that it doesn’t need to be rushed.
One day at a time.
One color at a time.
One stitch at a time.
If you’ve ever wanted to make a temperature quilt, I hope this gives you permission to start — imperfectly, thoughtfully, and with a plan that actually supports you.
And if you want a little help getting organized, don’t forget to grab the free Temperature Quilt Planner and start mapping out your own adventure.


I love your design and now must make at least 2 (I ma thinking of making one for each of my grandchildren for the year they were born, provided I can find data). Can you please explain the blocks made of 4 HSTs; why is there more than 2 colors? Thank you!
I LOVE that idea!! I bet you could find the data on ttps://weatherspark.com The blocks with 4 smaller HSTs = 4 different days. The blocks with 1 large HST = 1 day. I did that just to make the design a little more interesting 😉
I wish someone would kit your fabric selections. They’re wonderful!